Last Updated on August 3, 2025 by Team Digital Web Verse
Table of Contents
Okay, so you’ve finally launched your blog. You’ve picked your perfect blog name, maybe followed a guide like this one, and hit that magical “Publish” button on your first post.
Now what?
Well… now it’s time to actually see if anyone’s visiting your blog. 🫣
That’s where Google Analytics and Google Search Console come in.
And I get it — it sounds super techy. But don’t worry. I promise this isn’t as scary as it sounds. I’ll walk you through the exact steps I took when I first set mine up — screenshots, tools, and all. If I can do it, you absolutely can too.
Why You Need Both Google Analytics & Search Console (Even as a Beginner)
Let me keep it real — I ignored these tools for way too long when I started out. I thought, “Eh, I don’t have traffic yet, why bother?”
But that was a mistake. Here’s why these tools are gold, even when your blog is brand new:
- Google Analytics (GA4) shows how people interact with your site — page views, where they’re from, how long they stayed, etc.
- Search Console (GSC) shows how people are finding you on Google — what they’re searching, what keywords you’re showing up for, and whether Google can even access your site.
If you want your blog to grow, you need both.
Google Analytics vs Google Search Console — What’s the Difference?
Let me break it down real quick:
| Feature | Google Analytics (GA4) | Google Search Console (GSC) |
|---|---|---|
| Tracks user behavior? | ✅ Yes | ❌ No |
| Shows keyword/search data? | ❌ No | ✅ Yes |
| Helps with SEO? | ⚠️ Indirectly | ✅ Definitely |
| Does it need a tracking code on the site? | ✅ Yes | ✅ Yes (sort of, for verification) |
| Free to use? | ✅ 100% | ✅ 100% |
Step 1: Setting Up Google Analytics (GA4)
Alright, time to roll up our sleeves. Let’s set up GA4 first.
✅ Create a Google Analytics Account
- Head over to analytics.google.com.
- Sign in with your Google account.
- Click “Start Measuring” → Give your account a name (your blog name is fine).
- Continue through the setup steps — select your country, timezone, and currency.

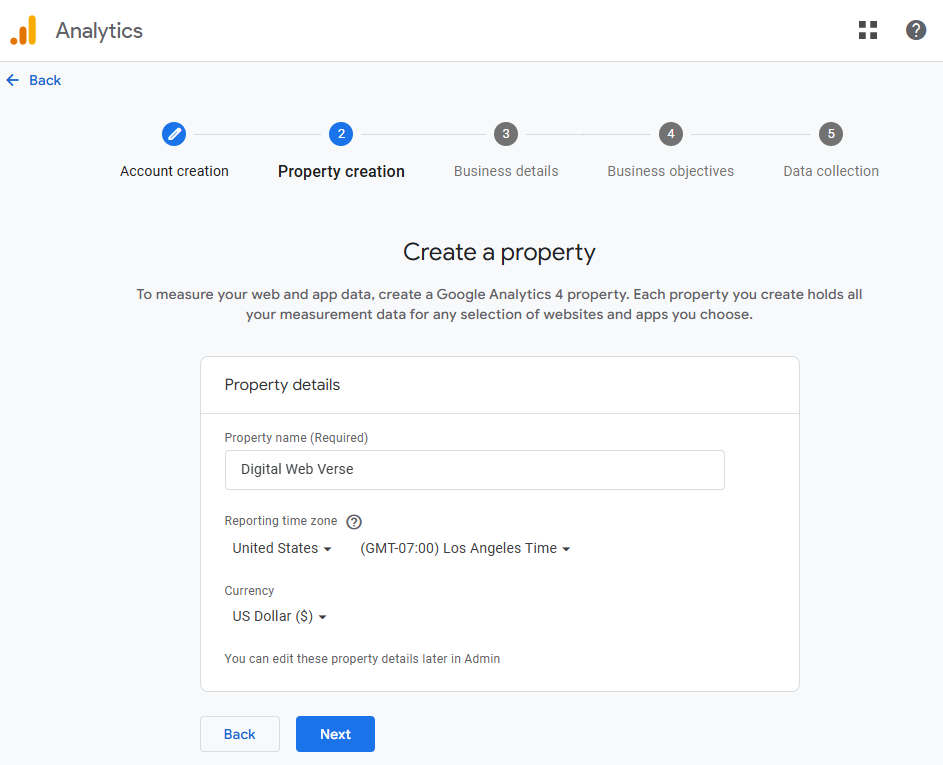
🏡 Set Up a Property
In GA speak, a “property” is basically your blog.
- Name your property (again, your blog name is fine).
- Choose your time zone and currency.
- Click Next, then answer a few questions about your business (you can choose “Blog” or “Other”).
- Click “Create.”
🔌 Add Tracking Code to Your Website
Now you need to connect your blog to Google Analytics so it can start collecting data.
If You’re Using WordPress + a Plugin:
- Install the free Site Kit by Google plugin (super easy).
- Connect your Google account, follow the prompts, and you’re done. 🙌
If You’re Doing It Manually:
- In Google Analytics, go to Admin → Data Streams → Click your website.
- Copy the “G-XXXXXXXX” code (this is your Measurement ID).
- Paste it inside your website’s
<head>tag — either directly or via your theme settings.

🔍 Check if It’s Working
Head to Reports → Real-Time in your GA dashboard.
Then open your blog in a separate tab. You should see your own visit pop up within a few seconds.
Step 2: Setting Up Google Search Console (GSC)
Alright, Google Analytics is done. Time for Search Console.
🧾 Add Your Website
- Go to search.google.com/search-console.
- Click “Add Property.”
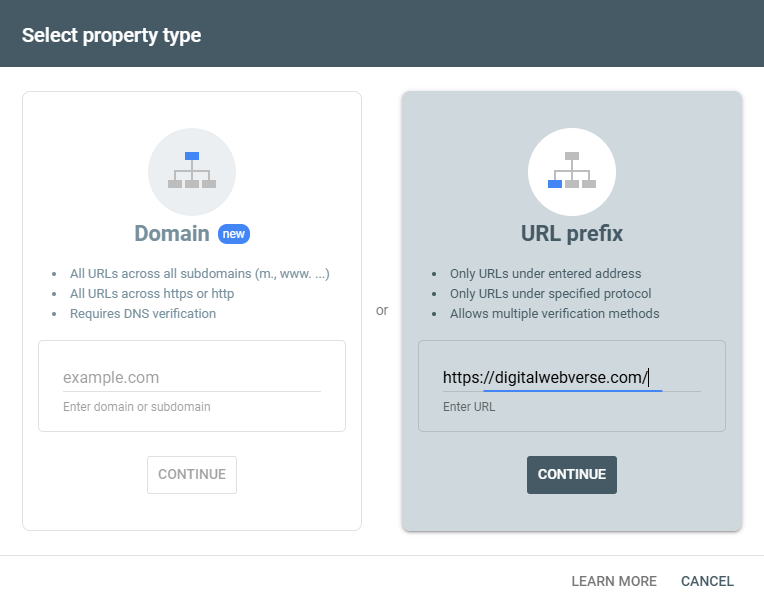
- Choose between Domain and URL prefix:
- Domain covers all subdomains (e.g.,
www.yourblog.comandyourblog.com). - URL Prefix is simpler if you’re only using one version.
I personally started with URL Prefix — easier to verify, especially for beginners.

🛡️ Verify Ownership
There are a few ways to verify, but if you have already installed Site Kit, it’s honestly the easiest.
Otherwise:
- Choose HTML Tag → Copy the code.
- Paste it in your website’s
<head>section (same spot as the GA code). - Click Verify in GSC.
Done.
🗺️ Submit Your Sitemap
This step tells Google about your blog structure — it helps with faster indexing.
- Go to GSC → Sitemaps.
- Enter
sitemap_index.xmlat the end of your domain (likeyourblog.com/sitemap_index.xml). - Click Submit.
If you’re using WordPress with Yoast or Rank Math, these plugins auto-generate the sitemap.
💡 Take your blog growth to the next level:
Optional But Handy: Connect GA4 + GSC
This step isn’t necessary, but I recommend it — it helps you see search data inside your GA4 dashboard.
🔗 How to Link Them:
- In GA4, go to Admin → Product Links → Search Console Links.
- Click Link → Choose your property → Connect.
Once it’s set up, you’ll see search queries, impressions, and clicks right inside Google Analytics.
FAQs
Is Google Analytics free to use?
Yes. Both Google Analytics and Google Search Console are completely free.
Can I use Google Analytics without Search Console?
Yep, totally. But you’ll be missing out on keyword data and indexing info — GSC is important if you care about SEO.
Do I really need both tools?
Honestly… yes. They work together like peanut butter and jelly. GA shows you what people do after they land, and GSC shows how they found you in the first place.
Final Thoughts
Setting up Google Analytics and Search Console might feel a bit techy at first, but it’s 100% worth it. You can’t grow what you don’t measure, right?
✅ Ready to Start?
Now that your blog’s connected and ready to track, you can focus on what matters — writing great content.
Start brainstorming with these blog niche ideas or go back and tweak your older posts using keyword insights from GSC.
Need help picking your theme, setting up hosting, or staying on track?
Grab our free Beginner Blogger Checklist — includes blog setup steps, SEO prep, monetization pointers, and more.
Or, if you’re ready to dive in:
👉 Compare Hosting Options Here →
👉 Set Up Your WordPress Blog (Step-by-Step)
👉 Use our exclusive 65% OFF HostGator link and launch your blog today. It’s what I used — and still recommend.

